etotakeo 发布的文章

感谢蝈蝈大佬开发的 mtk_uartboot 工具,这样就可以随便刷砖了
适用系列:MediaTek MT7622、MT7981、MT7986、MT7988 SoC

1.下载工具

地址:https://github.com/981213/mtk_uartboot/releases
Windows 用户选择 mtk_uartboot-x86_64-pc-windows-msvc.zip
Linux 用户选择 mtk_uartboot-x86_64-unknown-linux-gnu.tar.gz

手动编译(Linux)

不打算自己构建工具请忽略此节
首先自行安装 rust 编译环境,我这里用的是 ubuntu

sudo apt install aptitudesudo aptitude install rust-all

开始构建(以在 x86 上运行为例):

git clone https://github.com/981213/mtk_uartboot && cd mtk_uartbootcargo build --verbose --locked --release --target x86_64-unknown-linux-gnu

目标文件:target/x86_64-unknown-linux-gnu/release/mtk_uartboot

2. 编译 ATF (RAM Boot)

不打算自己编译 bl2 请忽略此节

手动编译(Linux)

git clone -b mtksoc --single-branch https://github.com/mtk-openwrt/arm-trusted-firmware
cd arm-trusted-firmware

开启RAM Boot需要打个小补丁:

--- a/plat/mediatek/apsoc_common/bl2/Config-uart_dl.in
+++ b/plat/mediatek/apsoc_common/bl2/Config-uart_dl.in
@@ -10,7 +10,7 @@ config _RAM_BOOT_RAM_BOOT_UART_DL     bool "Enable RAM boot UART download support"
     depends on _BOOT_DEVICE_RAM     depends on !_RAM_BOOT_DEBUGGER_HOOK
-    depends on _INTERNAL
+    # depends on _INTERNAL
     default n  # Makefile options

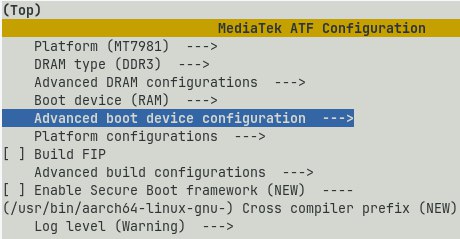
然后就可以选择构建目标了(以MT7981 DDR3内存为例):

Advanced boot device configuration里面
选中Enable RAM boot UART download support

注意:MT7981B需要在Advanced DRAM configurations里面选择
内存封装为BGA,默认是QFN,不改此项刷入 bl2 必砖

开始构建:make CROSS_COMPILE=aarch64-linux-gnu-
目标文件:build/mt7981/release/bl2.bin

3.开始救砖

我这里提供一份预先构建的 bl2:https://www.lanzouw.com/ioTYu1pvi23g
涵盖 MT7622、MT7981、MT7986 DDR3/4MT7988 没试过,不知道
MT7981 DDR3内存为例开始救砖:

Linux 上:

注意:此时不能有其它程序访问/dev/ttyUSB0
其中fip.bin为某个机子的 uboot,/dev/ttyUSB0为连接至路由器 UART 的串口

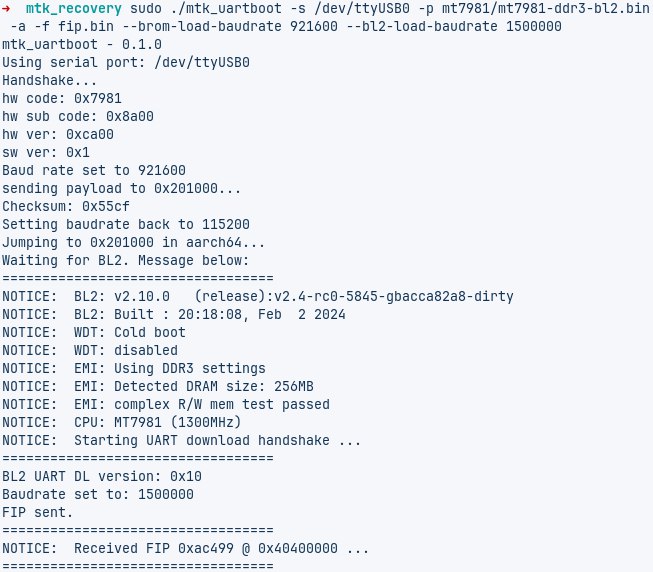
sudo ./mtk_uartboot -s /dev/ttyUSB0 -p mt7981/mt7981-ddr3-bl2.bin -a -f fip.bin --brom-load-baudrate 921600 --bl2-load-baudrate 1500000

如果你的串口承受不了 1500000 的波特率,那么请将--brom-load-baudrate--bl2-load-baudrate设置成 115200

sudo ./mtk_uartboot -s /dev/ttyUSB0 -p mt7981/mt7981-ddr3-bl2.bin -a -f fip.bin --brom-load-baudrate 115200 --bl2-load-baudrate 115200


打印Received FIP后使用串口工具访问串口,此时会打印Hit any key to stop autoboot
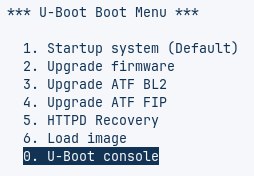
操作上下键分别选择Upgrade ATF BL2Upgrade ATF FIP即可完成救砖

Windows 上:

注意:此时不能有其它程序访问COM4
其中fip.bin为某个机子的 uboot,COM4为连接至路由器 UART 的串口

.\mtk_uartboot.exe -s COM4 -p .\mt7981\mt7981-ddr3-bl2.bin -a -f fip.bin --brom-load-baudrate 921600 --bl2-load-baudrate 1500000

如果你的串口承受不了 1500000 的波特率,那么请将--brom-load-baudrate--bl2-load-baudrate设置成 115200

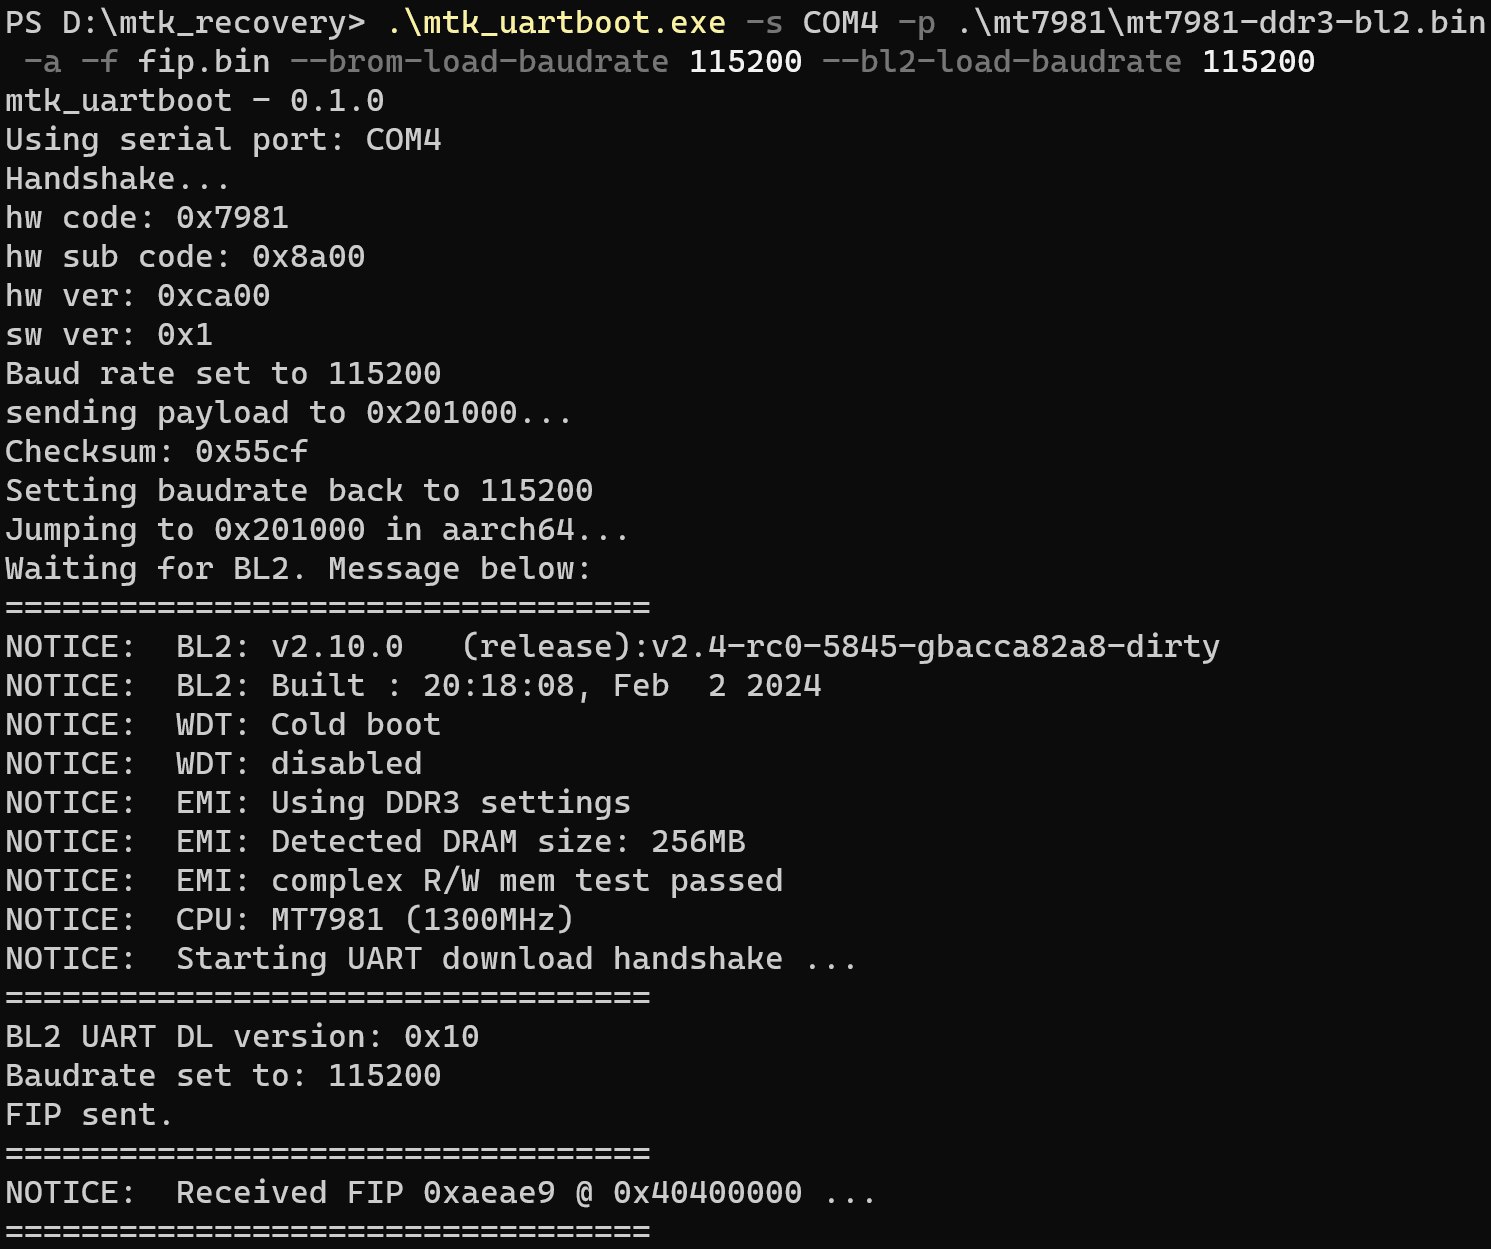
.\mtk_uartboot.exe -s COM4 -p .\mt7981\mt7981-ddr3-bl2.bin -a -f fip.bin --brom-load-baudrate 115200 --bl2-load-baudrate 115200

打印Received FIP后使用串口工具访问串口,操作上下键进入Boot Menu完成救砖

转载至:暗云

Docker-compose的官方库

首先安装docker

一键安装docker

curl -fsSL https://get.docker.com | bash -s docker

安装docker-compose


sudo curl -L "https://github.com/docker/compose/releases/download/v2.29.7/docker-compose-$(uname -s)-$(uname -m)" -o /usr/local/bin/docker-compose
sudo chmod +x /usr/local/bin/docker-compose

安装完成后,你可以通过运行以下命令来验证安装是否成功:

docker-compose --version

然后就可以愉快的使用docker-compose了

在Linux上挂载WebDAV,您可以使用davfs2工具来实现。以下是具体的步骤:

安装davfs2工具:
在终端中运行以下命令来安装davfs2工具:

sudo apt-get install davfs2

配置davfs2:
在终端中运行以下命令来编辑davfs2的配置文件:

sudo nano /etc/davfs2/davfs2.conf

确保配置文件中有以下配置项并取消注释:

# Uncomment the following line if you want to enable caching
use_locks       0

创建本地挂载点:
在终端中运行以下命令来创建一个本地挂载点:

sudo mkdir /mnt/webdav

挂载WebDAV:
在终端中运行以下命令来挂载WebDAV:

sudo mount -t davfs http://webdav_server_address /mnt/webdav

在执行以上命令时,将http://webdav_server_address替换为您要连接的WebDAV服务器的地址。

输入用户名和密码:
当提示输入用户名和密码时,请输入您的WebDAV服务器的用户名和密码。

挂载成功后,您可以通过/mnt/webdav目录来访问和管理WebDAV服务器上的文件。如果您想要卸载WebDAV,可以使用以下命令:

sudo umount /mnt/webdav

转载至:亿速云

太烦了,之前去开 lightsail 的机器,每次都不能使用密码登陆,然后在网上翻来翻去找到了这篇来自萌咖的文章。

将下面代码中的第一句中的 Vicer 改为自己将要设置的密码.
否则默认root密码为Vicer.
创建instance时,点击add launch script,将下列代码复制进去(注意更改 root 密码)如下图所示.

echo root:Vicer |sudo chpasswd root
sudo sed -i 's/^.*PermitRootLogin.*/PermitRootLogin yes/g' /etc/ssh/sshd_config;
sudo sed -i 's/^.*PasswordAuthentication.*/PasswordAuthentication yes/g' /etc/ssh/sshd_config;
sudo reboot

对于 EC2,GCE 等机器也可以使用.

如果是甲骨文的机器,只能使用 root + 密码登录 SSH,root + SSH 密匙登录仍然提示:Please login as the user “opc” rather than the user “root”.
无意中发现玄机其实在 /root/.ssh/authorized_keys 里面。打开这个文件,里面是这样子:

no-port-forwarding,no-agent-forwarding,no-X11-forwarding,command="echo 'Please login as the user \"opc\" rather than the user \"root\".';echo;sleep 10" ssh-rsa ooxxxxxx55524242442……此处省略 1024 万字 ……
ssh-ras XXX 为初始化实例时添加的 SSH 公钥,亲测,把 authorized_keys 多余的代码:

no-port-forwarding,no-agent-forwarding,no-X11-forwarding,command="echo 'Please login as the user \"opc\" rather than the user \"root\".';echo;sleep 10"
去掉,就可以愉快的使用 root + SSH 密匙登录。

P.S 如果不使用秘钥登录或者后面会使用秘钥登录,直接把 authorized_keys 全部删掉也是可以的

不能添加代码的机器,可以登录进 ssh,再执行上面的代码.
也可以开启 root 登陆.
以上代码在 Debian/Ubuntu 上通过测试.
其他发行版自行测试.

用法:
  certbot [子命令] [选项] [-d 域名] [-d 域名] ...

Certbot工具用于获取和安装 HTTPS/TLS/SSL 证书。默认情况下,Certbot会尝试为本地网页服务器
(如果不存在会默认安装一个到本地)获取并安装证书。最常用的子命令和选项如下:

获取, 安装, 更新证书:
    (默认) run       获取并安装证书到当前网页服务器
    certonly        获取或更新证书,但是不安装
    renew           更新已经获取但快过期的所有证书
   -d 域名列表        指定证书对应的域名列表,域名之间使用逗号分隔

  --apache          使用Apache插件进行身份认证和安装
  --standalone      运行一个独立的网页服务器用于身份认证
  --nginx           使用Nginx插件进行身份认证和安装
  --webroot         把身份认证文件放置在服务器的网页根目录下
  --manual          使用交互式或脚本钩子的方式获取证书

   -n               非交互式运行
  --test-cert       从预交付服务器上获取测试证书
  --dry-run         测试获取或更新证书,但是不存储到本地硬盘

证书管理:
    certificates    显示使用Certbot生成的所有证书的信息
    revoke          撤销证书(supply --cert-path)
    delete          删除证书

管理你的Let's Encrypt账户
    register        创建Let's Encrypt ACME账户
  --agree-tos       同意ACME服务器的订阅协议
   -m EMAIL         接收有关账户的重要通知的邮箱地址

可选参数:
  -h, --help            显示帮助信息,然后退出
  -c 配置文件, --config 配置文件
                        配置文件的路径 (默认: /etc/letsencrypt/cli.ini
                        或 ~/.config/letsencrypt/cli.ini)
  -v, --verbose         当前参数可以重复使用多次来增加输出信息的详细程度,例如 -vvv.
                        (默认: -2)
  -n, --non-interactive, --noninteractive
                        非交互式运行,即运行过程中不需要询问用户输入,但需要额外的命令行
                        参数。当客户端发现参数缺失时会给出相应的说明。(默认: False)
  --force-interactive   无论Certbot是否以命令行的方式运行,强制交互式运行。当前参数不能
                        用于renew子命令。(默认: False)
  -d 域名列表, --domains 域名列表, --domain 域名列表
                        指定域名列表。如果有多个域名,可以多次使用-d参数,也可以在-d参数后
                        使用逗号分隔的域名列表。(默认: 询问)
  --cert-name 证书名称   指定证书名称。每次Certbot运行只使用一个证书名称。可以使用命令
                        'certbot certificates'查看已生成的证书名称。当创建新的证书时,
                        此选项用于指定证书的名称。(默认: 无)
  --dry-run             使用客户端执行一次试运行,获取测试证书(无效的证书)但不保存到磁盘。
                        当前选项仅用于'certonly'和'renew'子命令。
                        注: 尽管 --dry-run 选项试图阻止任何对系统的修改,但并不能做到
                        完全避免: 如果使用类似apache或nginx网页服务器来认证插件,
                        程序运行过程中,会尝试修改或恢复配置文件来获取测试证书,
                        也会重启网页服务器来部署和回滚这些修改。如果定义了 --pre-hook 和
                        --post-hook 选项它们会被同时执行,这两个选项有助于更精确地模拟
                        更新证书。--renew-hook 选项在这里不会被执行。(默认: False)
  --preferred-challenges PREF_CHALLS
                        A sorted, comma delimited list of the preferred
                        challenge to use during authorization with the most
                        preferred challenge listed first (Eg, "dns" or "tls-
                        sni-01,http,dns"). Not all plugins support all
                        challenges. See
                        https://certbot.eff.org/docs/using.html#plugins for
                        details. ACME Challenges are versioned, but if you
                        pick "http" rather than "http-01", Certbot will select
                        the latest version automatically. (default: [])
  --user-agent 用户代理
                        设置本客户端的用户代理信息。用户代理信息用于CA机构收集关于操作系统
                        和插件的使用成功率。如果你希望隐藏此信息,设置此选项为""。
                        (默认: CertbotACMEClient/0.12.0 (Ubuntu 16.04.2 LTS)
                        Authenticator/XXX Installer/YYY)

自动化:
  用于自动运行或其他情况的参数

  --keep-until-expiring, --keep, --reinstall
                        如果被请求的证书已经存在,那么不执行更新操作直到证书将要过期
                        (如果使用了'run'子命令,无论是否过期证书都会被更新)。
                        (默认: 询问)
  --expand              如果请求的证书名字是已经存在的证书名字的子集,那么这个本地证书
                        会被重置并重命名。(默认: 询问)
  --version             显示程序和版本号,然后退出
  --force-renewal, --renew-by-default
                        如果请求的证书已经存在,无论是否快要到期,更新该证书。
                        (通常使用 --keep-until-expiring 选项)。
                        该选项默认包含了 --expand 选项的功能。(默认: False)
  --renew-with-new-domains
                        如果被请求的证书已经存在,但是域名变了,那么无论该证书是否将要过期
                        都会被更新。(默认: False)
  --allow-subset-of-names
                        When performing domain validation, do not consider it
                        a failure if authorizations can not be obtained for a
                        strict subset of the requested domains. This may be
                        useful for allowing renewals for multiple domains to
                        succeed even if some domains no longer point at this
                        system. This option cannot be used with --csr.
                        (default: False)
  --agree-tos           同意ACME订阅协议 (默认: 询问)
  --duplicate           Allow making a certificate lineage that duplicates an
                        existing one (both can be renewed in parallel)
                        (default: False)
  --os-packages-only    (仅用于 certbot-auto) 安装系统依赖包,然后停止 (默认: False)
  --no-self-upgrade     (仅用于 certbot-auto) 禁止 certbot-auto 脚本自动升级自己到
                        新的发布版本 (默认: 自动升级)
  -q, --quiet           程序运行只输出错误信息。这个选项对于 cron 等自动化工具很有用。
                        该选项默认包含了 --non-interactive 选项的功能。(默认: False)

安全:
  有关安全的参数和服务器设置

  --rsa-key-size N      RSA密钥的大小。 (默认: 2048)
  --must-staple         为证书添加 OCSP Must Staple 扩展。当Apache版本高于2.3.3时,
                        自动配置 OCSP Stapling 支持。 (默认: False)
  --redirect            对于新认证的虚拟主机,自动重定向HTTP到HTTPS。 (默认: 询问)
  --no-redirect         对于新认证的虚拟主机,不要重定向HTTP到HTTPS。 (默认: 询问)
  --hsts                Add the Strict-Transport-Security header to every HTTP
                        response. Forcing browser to always use SSL for the
                        domain. Defends against SSL Stripping. (default:
                        False)
  --uir                 Add the "Content-Security-Policy: upgrade-insecure-
                        requests" header to every HTTP response. Forcing the
                        browser to use https:// for every http:// resource.
                        (default: None)
  --staple-ocsp         Enables OCSP Stapling. A valid OCSP response is
                        stapled to the certificate that the server offers
                        during TLS. (default: None)
  --strict-permissions  Require that all configuration files are owned by the
                        current user; only needed if your config is somewhere
                        unsafe like /tmp/ (default: False)

测试:
  The following flags are meant for testing and integration purposes only.

  --test-cert, --staging
                        Use the staging server to obtain or revoke test
                        (invalid) certs; equivalent to --server https://acme-
                        staging.api.letsencrypt.org/directory (default: False)
  --debug               Show tracebacks in case of errors, and allow certbot-
                        auto execution on experimental platforms (default:
                        False)
  --no-verify-ssl       Disable verification of the ACME server's certificate.
                        (default: False)
  --tls-sni-01-port TLS_SNI_01_PORT
                        Port used during tls-sni-01 challenge. This only
                        affects the port Certbot listens on. A conforming ACME
                        server will still attempt to connect on port 443.
                        (default: 443)
  --http-01-port HTTP01_PORT
                        Port used in the http-01 challenge. This only affects
                        the port Certbot listens on. A conforming ACME server
                        will still attempt to connect on port 80. (default:
                        80)
  --break-my-certs      Be willing to replace or renew valid certs with
                        invalid (testing/staging) certs (default: False)

路径:
  修改有关执行路径和服务器的参数

  --cert-path 证书路径
                        Path to where cert is saved (with auth --csr),
                        installed from, or revoked. (default: None)
  --key-path 密钥路径    Path to private key for cert installation or
                        revocation (if account key is missing) (default: None)
  --chain-path 钥匙链路径
                        Accompanying path to a certificate chain. (default:
                        None)
  --config-dir 配置文件目录
                        Configuration directory. (default: /etc/letsencrypt)
  --work-dir 工作目录    Working directory. (default: /var/lib/letsencrypt)
  --logs-dir 日志目录    Logs directory. (default: /var/log/letsencrypt)
  --server 服务器        ACME Directory Resource URI. (default:
                        https://acme-v01.api.letsencrypt.org/directory)

管理:
  Various subcommands and flags are available for managing your
  certificates:

  certificates          List certificates managed by Certbot
  delete                Clean up all files related to a certificate
  renew                 Renew all certificates (or one specified with --cert-
                        name)
  revoke                Revoke a certificate specified with --cert-path
  update_symlinks       Recreate symlinks in your /etc/letsencrypt/live/
                        directory

run:
  获取和安装证书的选项

certonly:
  修改获取证书方式的选项

  --csr CSR             Path to a Certificate Signing Request (CSR) in DER or
                        PEM format. Currently --csr only works with the
                        'certonly' subcommand. (default: None)

renew:
  The 'renew' subcommand will attempt to renew all certificates (or more
  precisely, certificate lineages) you have previously obtained if they are
  close to expiry, and print a summary of the results. By default, 'renew'
  will reuse the options used to create obtain or most recently successfully
  renew each certificate lineage. You can try it with `--dry-run` first. For
  more fine-grained control, you can renew individual lineages with the
  `certonly` subcommand. Hooks are available to run commands before and
  after renewal; see https://certbot.eff.org/docs/using.html#renewal for
  more information on these.

  --pre-hook PRE_HOOK   Command to be run in a shell before obtaining any
                        certificates. Intended primarily for renewal, where it
                        can be used to temporarily shut down a webserver that
                        might conflict with the standalone plugin. This will
                        only be called if a certificate is actually to be
                        obtained/renewed. When renewing several certificates
                        that have identical pre-hooks, only the first will be
                        executed. (default: None)
  --post-hook POST_HOOK
                        Command to be run in a shell after attempting to
                        obtain/renew certificates. Can be used to deploy
                        renewed certificates, or to restart any servers that
                        were stopped by --pre-hook. This is only run if an
                        attempt was made to obtain/renew a certificate. If
                        multiple renewed certificates have identical post-
                        hooks, only one will be run. (default: None)
  --renew-hook RENEW_HOOK
                        Command to be run in a shell once for each
                        successfully renewed certificate. For this command,
                        the shell variable $RENEWED_LINEAGE will point to the
                        config live subdirectory containing the new certs and
                        keys; the shell variable $RENEWED_DOMAINS will contain
                        a space-delimited list of renewed cert domains
                        (default: None)
  --disable-hook-validation
                        Ordinarily the commands specified for --pre-hook
                        /--post-hook/--renew-hook will be checked for
                        validity, to see if the programs being run are in the
                        $PATH, so that mistakes can be caught early, even when
                        the hooks aren't being run just yet. The validation is
                        rather simplistic and fails if you use more advanced
                        shell constructs, so you can use this switch to
                        disable it. (default: False)

certificates:
  列出由Certbot管理的所有证书信息

delete:
  用于删除证书的选项

revoke:
  用于撤销证书的选项

  --reason {keycompromise,affiliationchanged,superseded,unspecified,cessationofoperation}
                        Specify reason for revoking certificate. (default: 0)

register:
  用于账户注册和更新的选项

  --register-unsafely-without-email
                        Specifying this flag enables registering an account
                        with no email address. This is strongly discouraged,
                        because in the event of key loss or account compromise
                        you will irrevocably lose access to your account. You
                        will also be unable to receive notice about impending
                        expiration or revocation of your certificates. Updates
                        to the Subscriber Agreement will still affect you, and
                        will be effective 14 days after posting an update to
                        the web site. (default: False)
  --update-registration
                        With the register verb, indicates that details
                        associated with an existing registration, such as the
                        e-mail address, should be updated, rather than
                        registering a new account. (default: False)
  -m EMAIL, --email EMAIL
                        Email used for registration and recovery contact.
                        (default: Ask)
  --eff-email           Share your e-mail address with EFF (default: None)
  --no-eff-email        Don't share your e-mail address with EFF (default:
                        None)

unregister:
  用于注销账户的选项

  --account 账户ID       需要注销的账户ID (默认: 无)

install:
  用于修改证书部署路径的选项

  --fullchain-path 完整钥匙链的路径
                        Accompanying path to a full certificate chain (cert
                        plus chain). (default: None)

config_changes:
  Options for controlling which changes are displayed

  --num NUM             How many past revisions you want to be displayed
                        (default: None)

rollback:
  Options for rolling back server configuration changes

  --checkpoints N       Revert configuration N number of checkpoints.
                        (default: 1)

plugins:
  Options for for the "plugins" subcommand

  --init                Initialize plugins. (default: False)
  --prepare             Initialize and prepare plugins. (default: False)
  --authenticators      Limit to authenticator plugins only. (default: None)
  --installers          Limit to installer plugins only. (default: None)

update_symlinks:
  Recreates cert and key symlinks in /etc/letsencrypt/live, if you changed
  them by hand or edited a renewal configuration file

plugins:
  Plugin Selection: Certbot client supports an extensible plugins
  architecture. See 'certbot plugins' for a list of all installed plugins
  and their names. You can force a particular plugin by setting options
  provided below. Running --help <plugin_name> will list flags specific to
  that plugin.

  --configurator CONFIGURATOR
                        Name of the plugin that is both an authenticator and
                        an installer. Should not be used together with
                        --authenticator or --installer. (default: Ask)
  -a AUTHENTICATOR, --authenticator AUTHENTICATOR
                        Authenticator plugin name. (default: None)
  -i INSTALLER, --installer INSTALLER
                        Installer plugin name (also used to find domains).
                        (default: None)
  --apache              Obtain and install certs using Apache (default: False)
  --nginx               Obtain and install certs using Nginx (default: False)
  --standalone          运行一个独立的网页服务器用于获取证书。(默认: False)
  --manual              Provide laborious manual instructions for obtaining a
                        cert (default: False)
  --webroot             把身份认证文件放置在服务器的网页根目录下用于获取证书。
                        (默认: False)

nginx:
  Nginx网页服务器插件 - Alpha版本

  --nginx-server-root NGINX_SERVER_ROOT
                        Nginx server root directory. (default: /etc/nginx)
  --nginx-ctl NGINX_CTL
                        Path to the 'nginx' binary, used for 'configtest' and
                        retrieving nginx version number. (default: nginx)

standalone:
  启动一个临时的网页服务器

manual:
  Authenticate through manual configuration or custom shell scripts. When
  using shell scripts, an authenticator script must be provided. The
  environment variables available to this script are $CERTBOT_DOMAIN which
  contains the domain being authenticated, $CERTBOT_VALIDATION which is the
  validation string, and $CERTBOT_TOKEN which is the filename of the
  resource requested when performing an HTTP-01 challenge. An additional
  cleanup script can also be provided and can use the additional variable
  $CERTBOT_AUTH_OUTPUT which contains the stdout output from the auth
  script.

  --manual-auth-hook MANUAL_AUTH_HOOK
                        Path or command to execute for the authentication
                        script (default: None)
  --manual-cleanup-hook MANUAL_CLEANUP_HOOK
                        Path or command to execute for the cleanup script
                        (default: None)
  --manual-public-ip-logging-ok
                        Automatically allows public IP logging (default: Ask)

webroot:
  Place files in webroot directory

  --webroot-path WEBROOT_PATH, -w WEBROOT_PATH
                        public_html / webroot path. This can be specified
                        multiple times to handle different domains; each
                        domain will have the webroot path that preceded it.
                        For instance: `-w /var/www/example -d example.com -d
                        www.example.com -w /var/www/thing -d thing.net -d
                        m.thing.net` (default: Ask)
  --webroot-map WEBROOT_MAP
                        JSON dictionary mapping domains to webroot paths; this
                        implies -d for each entry. You may need to escape this
                        from your shell. E.g.: --webroot-map
                        '{"eg1.is,m.eg1.is":"/www/eg1/", "eg2.is":"/www/eg2"}'
                        This option is merged with, but takes precedence over,
                        -w / -d entries. At present, if you put webroot-map in
                        a config file, it needs to be on a single line, like:
                        webroot-map = {"example.com":"/var/www"}. (default:
                        {})

apache:
  Apache网页服务器插件 - Beta版本

  --apache-enmod APACHE_ENMOD
                        Path to the Apache 'a2enmod' binary. (default:
                        a2enmod)
  --apache-dismod APACHE_DISMOD
                        Path to the Apache 'a2dismod' binary. (default:
                        a2dismod)
  --apache-le-vhost-ext APACHE_LE_VHOST_EXT
                        SSL vhost configuration extension. (default: -le-
                        ssl.conf)
  --apache-server-root APACHE_SERVER_ROOT
                        Apache server root directory. (default: /etc/apache2)
  --apache-vhost-root APACHE_VHOST_ROOT
                        Apache server VirtualHost configuration root (default:
                        /etc/apache2/sites-available)
  --apache-logs-root APACHE_LOGS_ROOT
                        Apache server logs directory (default:
                        /var/log/apache2)
  --apache-challenge-location APACHE_CHALLENGE_LOCATION
                        Directory path for challenge configuration. (default:
                        /etc/apache2)
  --apache-handle-modules APACHE_HANDLE_MODULES
                        Let installer handle enabling required modules for
                        you.(Only Ubuntu/Debian currently) (default: True)
  --apache-handle-sites APACHE_HANDLE_SITES
                        Let installer handle enabling sites for you.(Only
                        Ubuntu/Debian currently) (default: True)

null:
  Null Installer

转载至:色彩世界